
Complete Guide to Setting Up a Free VPN Server (VLESS, VMess, Trojan, SSH, SlowDNS)
Published · August 27, 2026
Setting up a private VPN server is now much easier thanks to a multi-protocol auto-installer script. You can enable several modern protocols at once, including Xray (VLESS, VMess, Trojan), Shadowsocks, OpenVPN, SSH, and SlowDNS, complete with a terminal-based account management menu.
The script is free and open source, with no IP licensing restrictions, so it can be used on any VPS.
Prerequisites
Before you begin, make sure you have the following:
- A VPS with root access
You need a VPS withrootaccess and a publicIPv4address. - A supported operating system
- Ubuntu 20.04, 22.04, 24.04
- Debian 10, 11, 12
- A domain or subdomain
A domain or subdomain pointed at your VPS IP via anArecord. For example:vpn.yourdomain.com. - Cloudflare (optional)
If you use Cloudflare for DNS management, make sure the proxy status is disabled (DNS Only or the grey cloud icon).
Installation Steps
1. Switch to the Root User
Log in to your VPS via terminal or SSH, then switch to root:
sudo -i2. Run the Auto-Installer Script
Copy and run this command in your VPS terminal:
apt-get update && \
apt-get --reinstall --fix-missing install -y whois bzip2 gzip coreutils wget screen nscd build-essential && \
wget --inet4-only --no-check-certificate -O setup.sh https://raw.githubusercontent.com/alrescha79-cmd/sc-vpn/refs/heads/main/setup.sh && \
chmod +x setup.sh && \
screen -S setup ./setup.sh
The installation runs automatically. When prompted for a domain, type the domain or subdomain you pointed at your VPS IP.
Important Notes and Troubleshooting
- If the terminal connection drops during installation:
Do not re-run the whole command from the start. Just log back in to the VPS and run:./setup.sh - Opening the control menu:
After installation and the automatic reboot, the main menu appears on its own. If it does not, run:menu - If the features menu (option 8) cannot be opened:
Exit the menu withCtrl + C, then download the updated features file:curl -o /usr/bin/features https://raw.githubusercontent.com/alrescha79-cmd/sc-vpn/refs/heads/main/project/features
Setting Up Telegram Bot Notifications
The server comes with a Telegram bot integration to monitor status and account creation in real time.
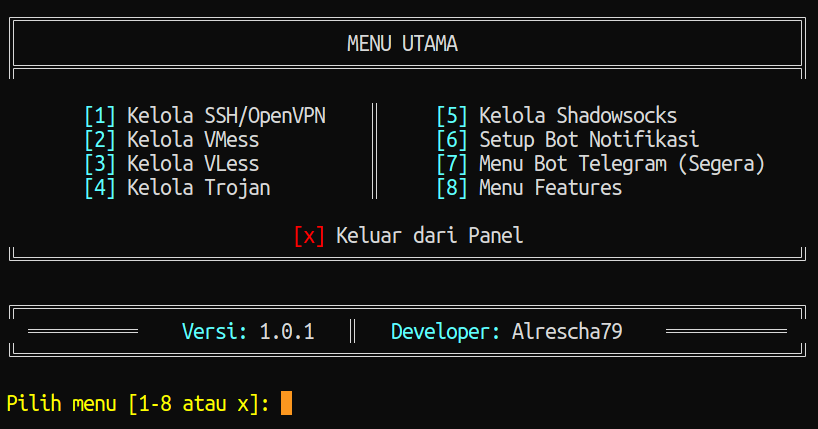
- Make sure you are in the main menu (run
menu). - Select number 6 to set up Telegram notifications.
- Confirm by typing
y(Yes).
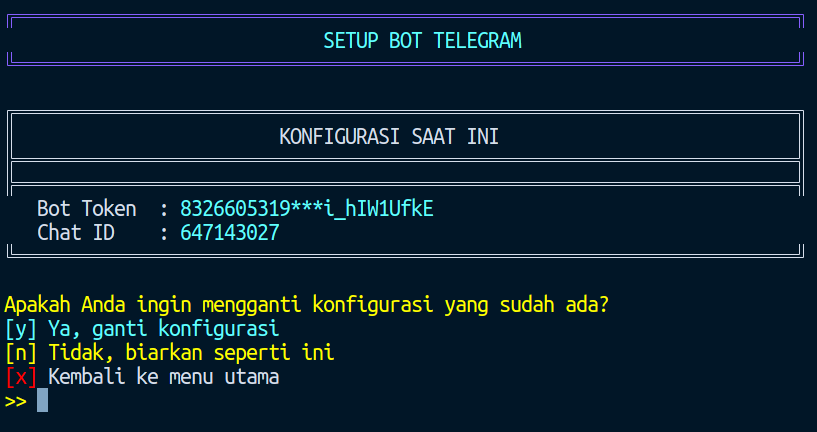
- Enter your Telegram Bot Token.
- Enter your Telegram Chat ID.
- Press Enter to save. Notifications will start automatically.
Quick Account Management Commands
Besides the menu command, you can create, delete, check, and renew accounts directly from the CLI:
Creating Accounts
add-vless: create a VLESS accountadd-vmess: create a VMess accountadd-trojan: create a Trojan accountadd-shadowsocks: create a Shadowsocks accountadd-ssh: create an SSH account
Checking Accounts
check-vless: list VLESS accounts and online userscheck-vmess: list VMess accounts and online userscheck-trojan: list Trojan accounts and online userscheck-shadowsocks: list Shadowsocks accounts and online userscheck-ssh: list online SSH users
Renewing and Deleting
- Renew:
renew-vless,renew-vmess,renew-trojan,renew-shadowsocks,renew-ssh - Delete:
del-vless,del-vmess,del-trojan,del-shadowsocks,del-ssh
Auto Reboot Schedule
By default, the server is set to reboot automatically every day at 05:00 to keep memory stable.
Changing the Schedule via the Menu
- In the main menu (
menu), select option 8 (System Settings).
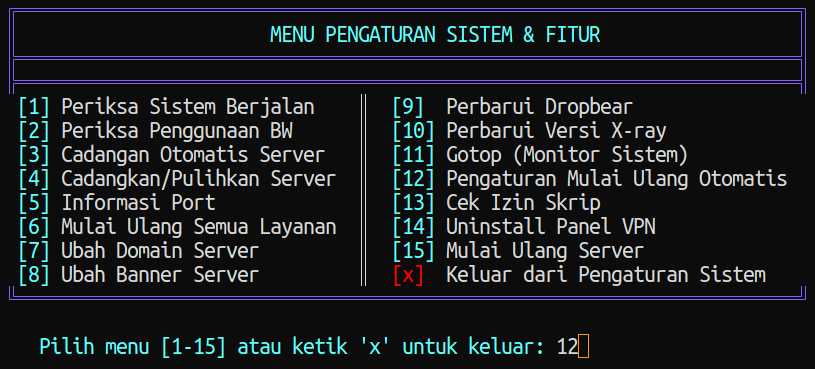
- Select number 12 to enter the auto reboot settings.
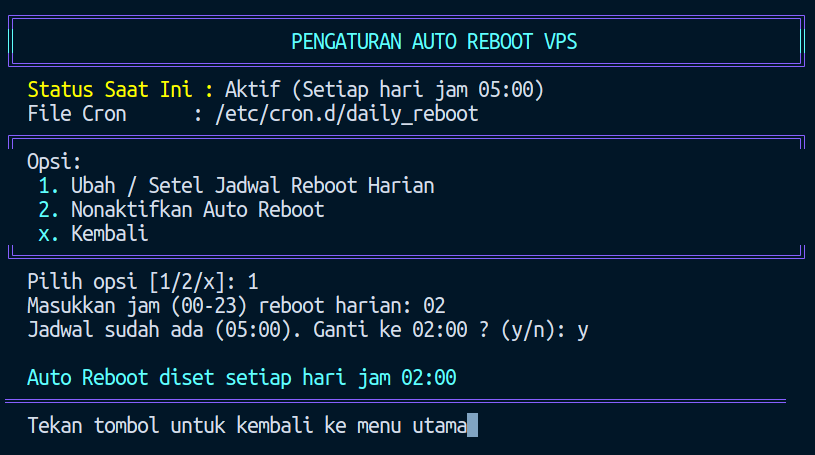
- Select 1 to change the reboot time. Enter the time in 24-hour format (for example,
04:00). - Type
yto save.
Setting or Cancelling via Crontab Directly
To set the schedule from the command line:
# Reboot every day at 05:00
crontab -l > /tmp/cron.txt
sed -i "/reboot$/d" /tmp/cron.txt
echo -e "\n"'0 5 * * * '"$(which reboot)" >> /tmp/cron.txt
crontab /tmp/cron.txt
rm -rf /tmp/cron.txt
To disable auto reboot:
crontab -l > /tmp/cron.txt
sed -i "/reboot$/d" /tmp/cron.txt
crontab /tmp/cron.txt
rm -rf /tmp/cron.txt
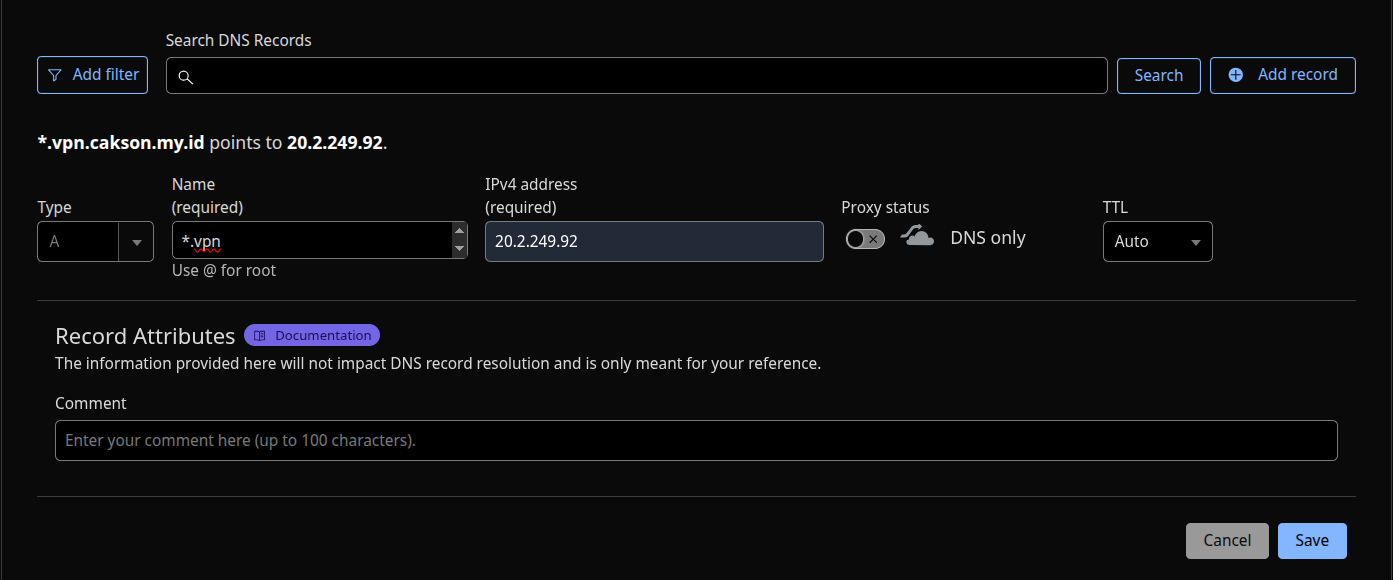
Wildcard DNS Setup in Cloudflare
To support random subdomains or CDN/SNI configurations for specific protocols:
- Go to the Cloudflare dashboard and select your domain.
- Open the DNS then Records tab.
- Add a new A record:
- Type:
A - Name:
@(or*for a wildcard) - IPv4 Address:
your VPS IP - Proxy Status:
DNS Only(grey cloud)
- Type:
- Click Save.
Support and Community
This script is developed as open source by @Alrescha79. If you run into issues or want to discuss modem and VPN network configuration:
- Telegram: @Alrescha79
- Email:
anggun@cakson.my.id - License: MIT License